I made these ladybugs with my young special ed class and they were all very successful. It would also be a good lesson for preschool or kindergarten.
9 Keeps,
1 Likes,
0 Comments
THE PLAN
2 sessions; 40 minutes per session
SWBAT develop fine motor skills while painting, drawing, tearing, cutting, and pasting to create a mixed media representation of a ladybug.
SWBAT explore color mixing while layering bleeding tissue paper and observe the colors mingle.
SWBAT practice cutting skills.
1. 9X12 white paper
2. bleeding tissue paper: mainly greens, yellows, blues
3. red tempera
4. red glitter
5. for the dots on the wings-cut out circles from black felt, foam, glitter paper, etc. or sponge paint them with black tempera
6. glue
7. scissors
8. black crayon or marker
9. silver sharpie
10. black paper for body
Day 1: Guide students in preparing their papers to be used for their ladybugs next week.
1. We first start by reading "Ten Little Ladybugs"
2. Students transition to their work area. Students dunk their 9x12 white papers (names written on back) in a tub filled with water.
3. Students apply bleeding tissue paper pieces in various greens, yellows, and blues to the wet paper. The colors from the tissue will bleed onto the damp paper to create a beautiful backdrop for the ladybug. The students delight in seeing how the colors mingle and mix before their eyes! Students will continue working until the entire paper is filled.
Tip: Use a spray bottle to wet their papers as they work since they tend to dry quickly. I had some tissue paper precut but I also encouraged my special ed students to tear some of the tissue paper as well.
4. Move the completed backgrounds to the drying and rack and set up with 9x12 paper & red tempera.
5. Students paint a new 9x12 paper with red tempera paint for the ladybug body. Once they have covered the whole paper with red, they can give a shake of red glitter onto the wet paint for some sparkle.
Day 2: Students create a ladybug with the painted papers created last week.
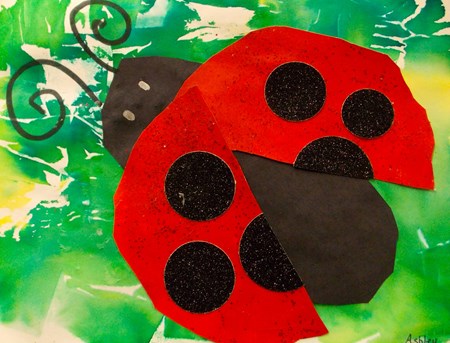
1. Trace a large circle on the back of the painted red paper
2. Cut out the circle
3. Draw a line down the middle of the circle (on the back)
4. Cut this line to create 2 semi circles which will be the ladybug’s wings
5. Draw a large oval shape on black paper for the ladybug’s body
6. Place the body on the background paper
7. Overlap both the wings on the body, be sure to leave black space showing at the top for the head!
8. Glue body and wings in place
9. Glue black paper dots onto the wings (or paint or sponge paint with black tempera)
10. Draw 2 antennae with black marker or crayon
11. Use white colored pencil or silver marker to make 2 dots for eyes on the head
Students will be assessed on their ability to listen to teacher directions, follow procedures, and meet learning objectives while completing the artwork to best of ability.
This is how I presented the lesson to my special ed students but it certainly can be adapted for a general ed preschool or kindergarten class.
THE STANDARDS
Visual Arts Standard 1: Understanding and applying media, techniques, and processes
[K-4] Students know the differences between materials, techniques, and processes
[K-4] Students use art materials and tools in a safe and responsible manner
THE FEATURES
Color/Value, Shape
Collage, Paper, Tempera
You must be logged in to keep, like, or comment on this resource.

Share!
Comment!