Students create 3-D figures using aluminum foil, plaster wrap, and paint. The embellish them to fit their theme.
9 Keeps,
0 Likes,
0 Comments
THE PLAN
7 sessions; 50 minutes per session
• I can create a 3-D figure using correct proportions
• I can creatively use materials and add details to my figure
Heavy duty aluminum foil, plaster wrap, acrylic paint, wooden base, various materials to embellish figures (fabric, yarn, model magic), artist statement handout
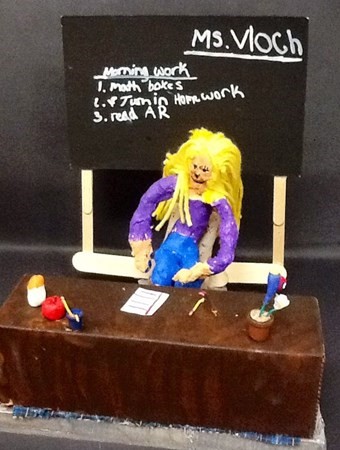
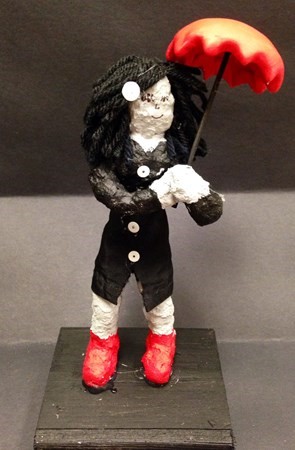
Tell students that they are now going to create a 3-D figure of their choice. They will be expected to use proper proportions and to create a figure engaged in an activity and/or placed in a setting.
Each student gets approximately 12x15 inches of heavy duty aluminum foil. Draw the diagram (see attached diagram) on the board. Have the students fold first in half (dotted line). Then make a cut in the middle bottom about two fingers width from the center fold. Next, make two more cuts, this time at the top and in thirds. Students should cut until approximately four fingers from the center fold. Once all cuts are made, students should gradually crunch the center together and then crunch arms, head, and feet. Warn students not to squeeze too tight because it is hard to undo.
When figures are formed, demonstrate to students how to wrap the foil figure in plaster gauze. Have students do this by dipping gauze in warm water and using two figures to squeeze out excess water. Then wrap figure until there is no foil showing. As they wrap the gauze students should smooth out any bumps. Let dry overnight.
Once dry, students will begin painting with acrylic. Tell students that acrylic can stain clothes and will ruin brushes if they are not cleaned well. Have students start with skin color and then paint the rest of figure (saving details for last). Paint for skin color will be created on an individual basis with assistance from the teacher. A generic peach skin tone is available without mixing but different variations of skin tones light to dark are encouraged. Later, hair can be painted or added with yarn later. Facial features will be drawn on with sharpie after the painting is complete.
After students start painting begin discussing ideas for props to go with their figure. A basketball player would need a ball and a net. A hunter would need a bow. A superhero might need a cape, and so on. Make a variety of materials available; yarn, cloth, ribbon, wire, wood scraps, model magic, sequins, glitter, tile pieces, pipe cleaners. Also provide wooden bases to decorate and to glue figure on to. Names should be written on bottom of base in sharpie.
For early finishers, students can create a backdrop out of cardboard for their figures. When complete, photographs should be taken and uploaded to Artsonia. Give each student an artist statement handout to help guide them in writing their artist statement. It includes sentence starter ideas. Students should explain what their figures are doing and why they created them this way. Students can also share with their classmates.
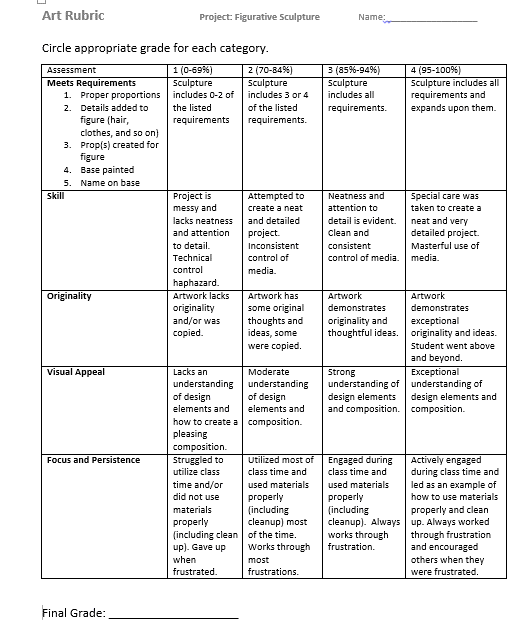
• Rubric (See Pictures)
• Artist statement(we upload to Artsonia)
This is a favorite lesson of my 5th graders. It is one lesson I do every year.
THE STANDARDS
Visual Arts Standard 1: Understanding and applying media, techniques, and processes
[5-8] Students intentionally take advantage of the qualities and characteristics of art media, techniques, and processes to enhance communication of their experiences and ideas
Visual Arts Standard 3: Choosing and evaluating a range of subject matter, symbols, and ideas
[5-8] Students use subjects, themes, and symbols that demonstrate knowledge of contexts, values, and aesthetics that communicate intended meaning in artworks


Share!
Comment!