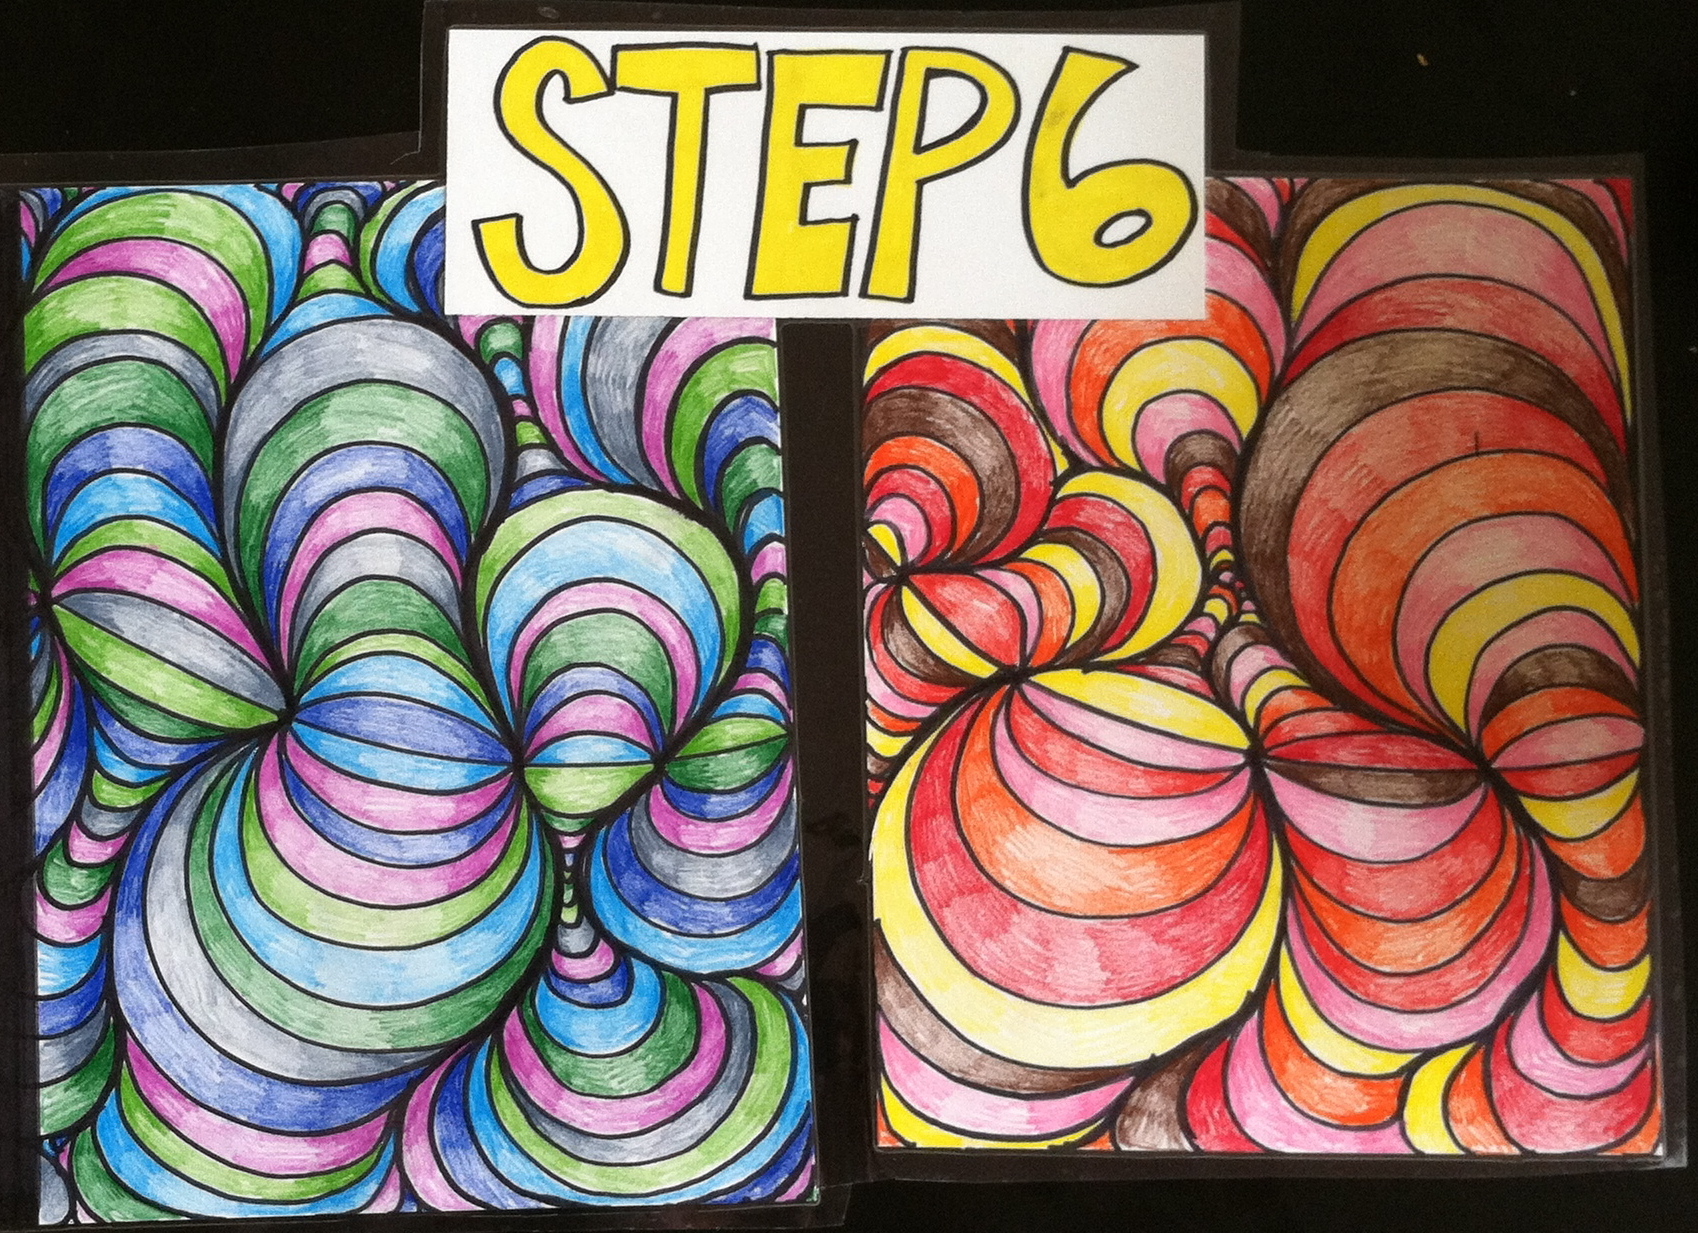
Students will use line to create designs that are also optical illusions. The students will shade the spaces between lines to give the composition a sense of space and form, using a warm or cool color scheme.
60 Keeps,
10 Likes,
1 Comments
THE PLAN
4 sessions; 60 minutes per session
Objectives: Upon completion of this lesson, students will be able to:
- Use line to create an optical illusion.
- Group together warm and cool colors.
- Use shading to create form within the line composition.
- Follow both written and spoken step-by-step instructions
Images of optical illusions, projector and screen, white drawing paper 10x10, pencils, erasers, thin black markers/sharpies, colored pencils, warm and cool color posters/games, shading poster, project step-board/handout
1. Show students a finished example of the line design project that they will be creating with a brief overview of the lesson objectives:
- Students will use line to create an optical illusion.
- Students will color their illusion with warm and cool colors.
- Students will use shading when coloring, to create form and enhance the illusion.
2. Give each student a piece of paper and the step-by-step handout for the lesson. Instruct students to write their name and room number on the paper, but not to begin because the first part of the project will be done together, step, by-step. Students may refer to the handout if they fall behind or need extra help. Also direct students to the step-by-step posters that they can look at for additional assistance.
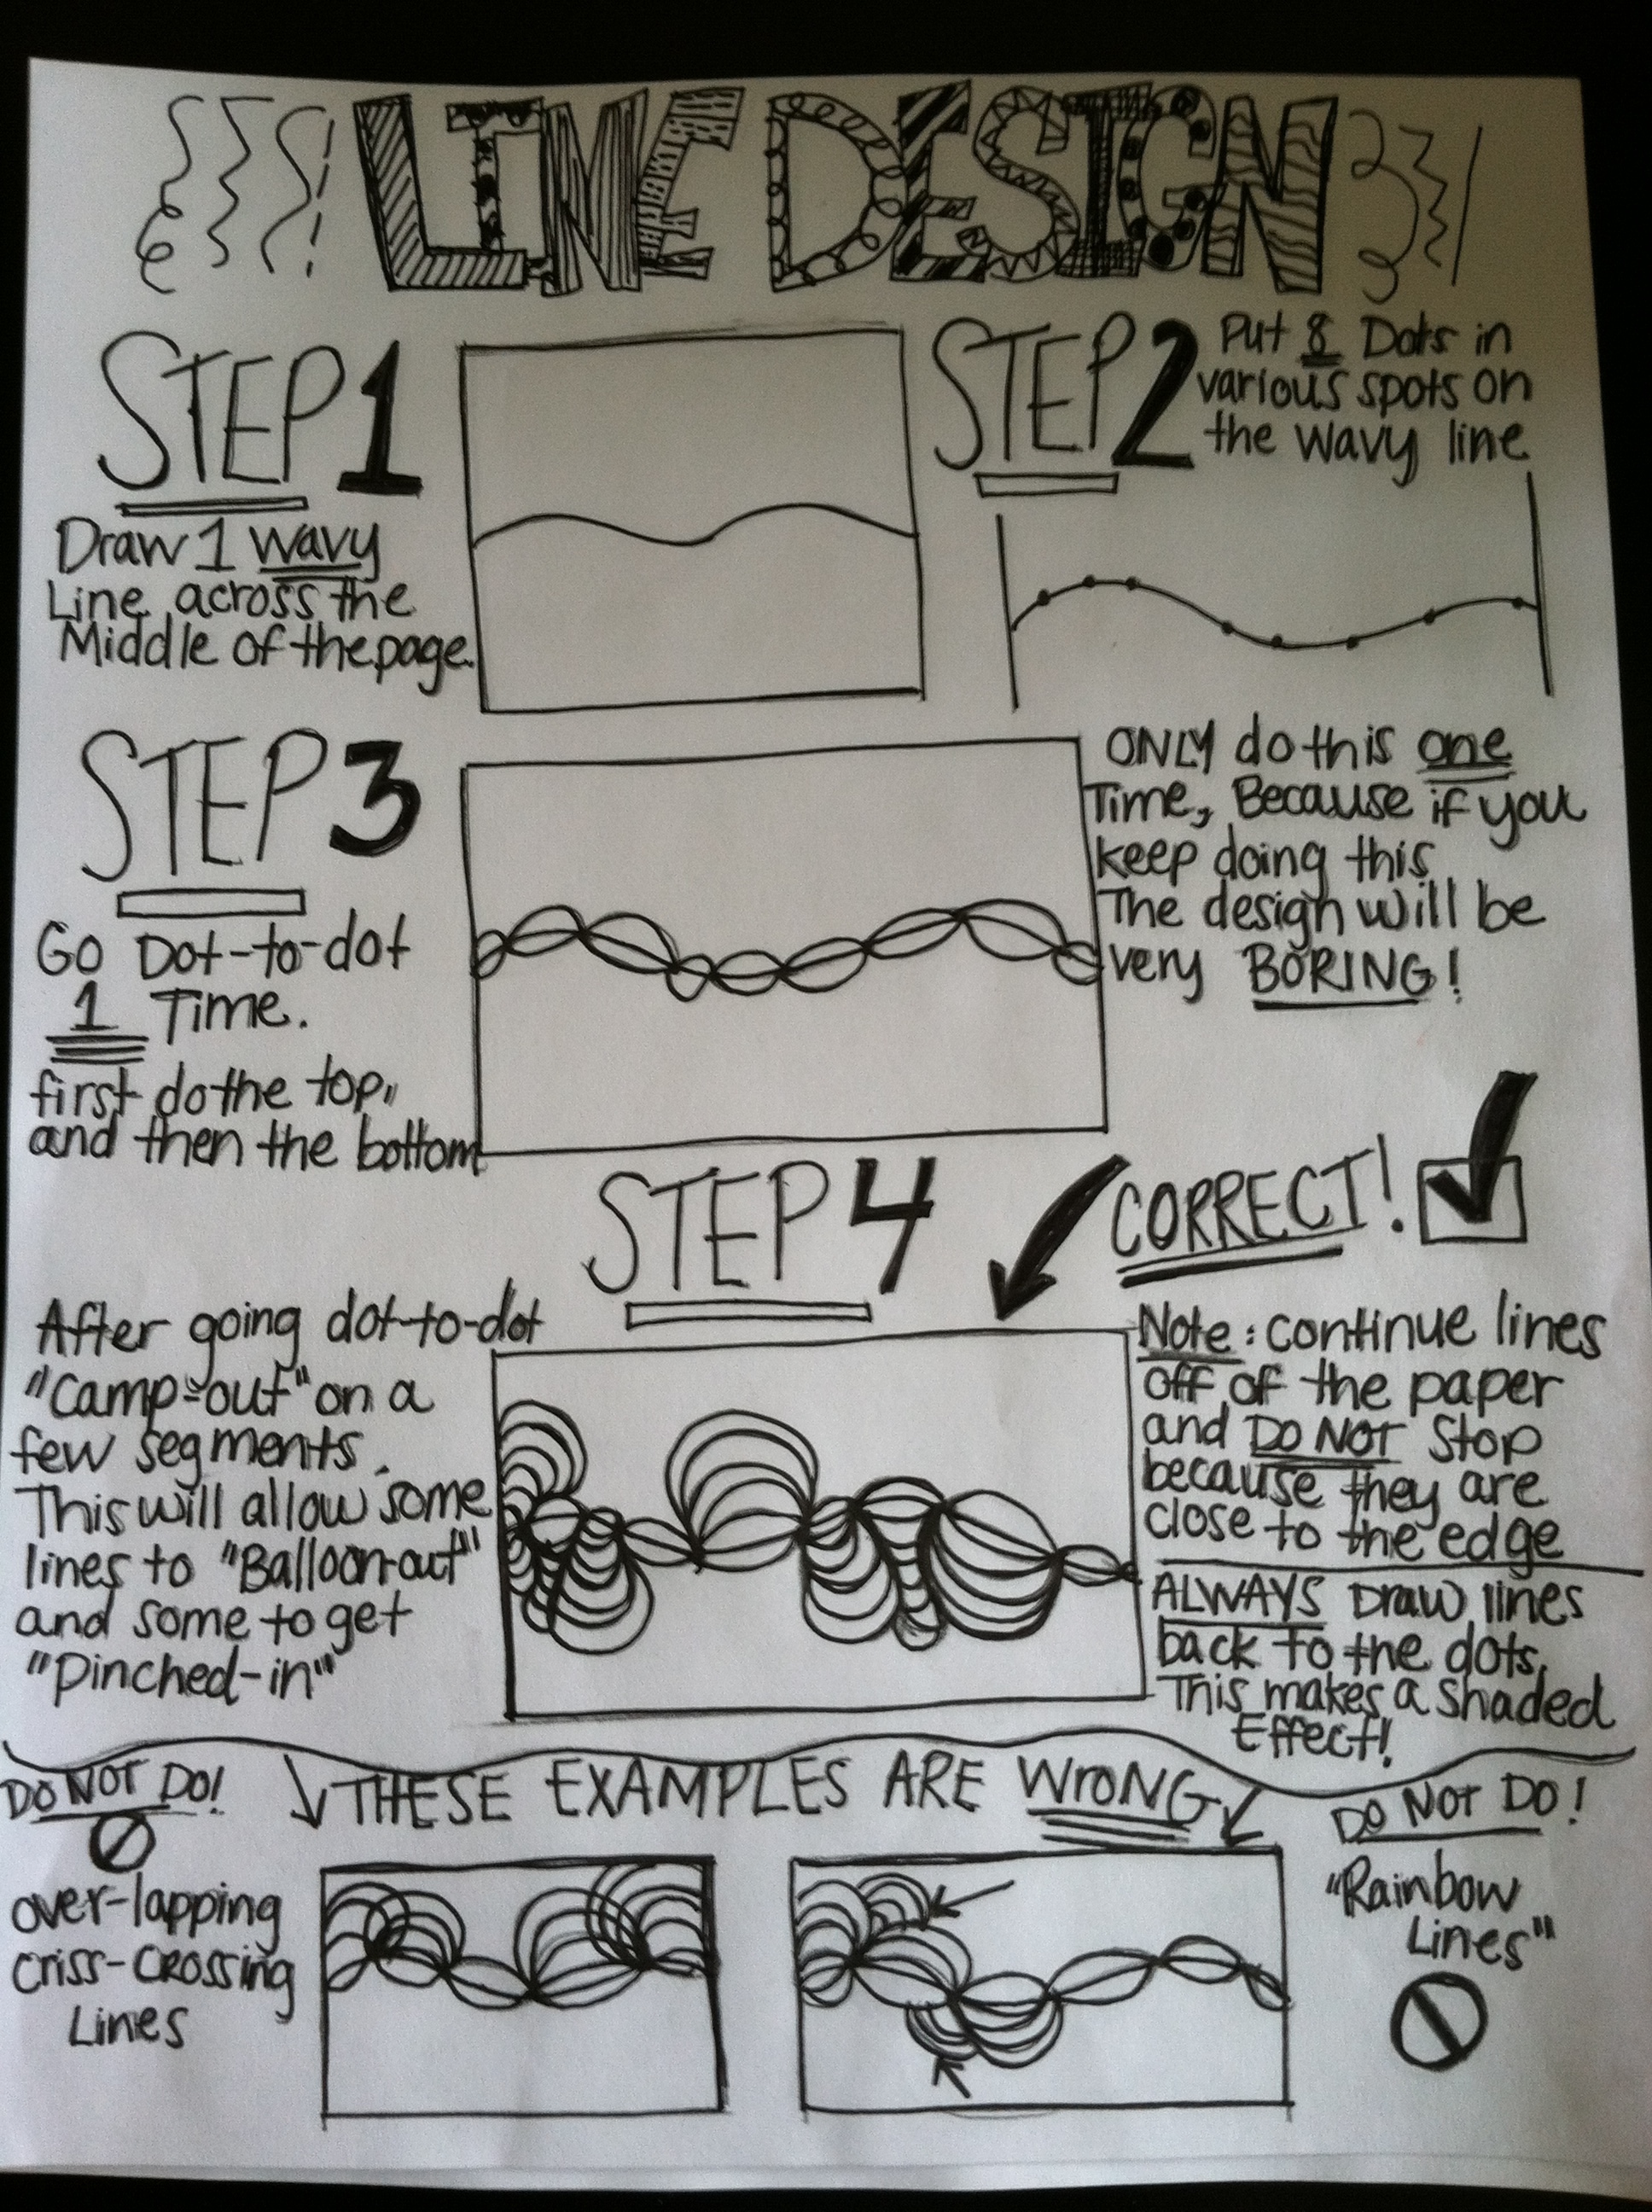
3. First, instruct students to draw a wavy line through the middle of their paper.
4. Then, instruct students to draw 8 dots at various locations on the line (some close, others far).
5. Show students how to go “dot-to-dot” with a scalloped line. First on the top, and then again on the bottom. Only do this once! If continued the design will look very boring and will lack the illusionistic quality we want to achieve.
6. Next, show students how to “camp out “on some of the segments. This allows some limes to “balloon-out” and some lines to get “pinched in.” Emphasize that all lines need to return to the dots that they originated from. This creates a neat shaded effect and it helps avoid mistakes. Also tell students that lines should continue off of the paper, and not stop because they are close to the edge.
7. Point out to students the wrong ways to draw their lines (on the handout).
These examples below are WRONG! No lines should overlap/criss-cross and no magically appearing rainbows. All lines must return to their original dots.
8. Students should use the remaining class time to finish drawing all of their lines (until the entire paper is filled) in pencil.
9. Clean up.
Day 2
1. Using the projector, show students how to trace all of their pencil lines very carefully with a black marker. Remind students of the importance of always returning to the original dot (even with outlining) because this creates a shaded effect.
2. Pass back projects along with the step-by-step handout.
3. If needed, students should finish drawing their lines in pencil first. Once that is completed, students should spend the remainder of the class period tracing over all of their pencil lines with a black marker.
4. Clean up.
Day 3/4
1. Review warm and cool colors by discussing the color wheel and the warm and cool collage posters.
2. Inform students that when they are ready to begin coloring their line designs that they have to choose whether they will use a warm color scheme or a cool color scheme. They cannot use both.
3. Using the projector, show students how to color their projects using color pencils and shading (darkest at the corners and lighter towards the middle of the line).
4. Also inform students that they should not use the same color right in a row. Each line should be bordering a different color.
5. Students should use the remaining class time to color their line designs.
6. Clean up.
Students will be assessed in alignment with the objectives of the lesson:
- Did the student follow all written and spoken directions correctly?
- Does the student’s project have an illusionistic quality as a result of line and shading?
- Did the student use a warm or cool color scheme correctly?
- Did the student use shading to create form in the composition?
Visual Arts Standard 1: Understanding and applying media, techniques, and processes
[5-8] Students select media, techniques, and processes; analyze what makes them effective or not effective in communicating ideas; and reflect upon the effectiveness of their choices
[5-8] Students intentionally take advantage of the qualities and characteristics of art media, techniques, and processes to enhance communication of their experiences and ideas
Visual Arts Standard 2: Using knowledge of structures and functions
[5-8] Students select and use the qualities of structures and functions of art to improve communication of their ideas
[5-8] Students generalize about the effects of visual structures and functions and reflect upon these effects in their own work
[5-8] Students employ organizational structures and analyze what makes them effective or not effective in the communication of ideas


Share!
Comment!