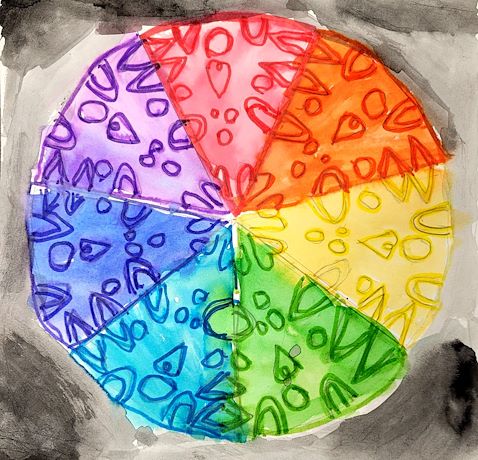
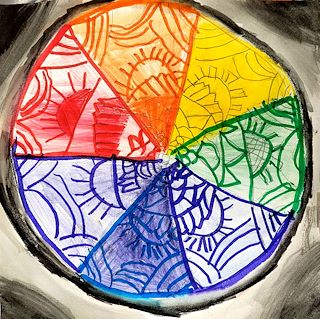
2nd grade students learn about the color wheel, different kinds of color wheels, and of course, ROYGBIV. Students use trace and flip a triangular design to create radial symmetry and use a varitey of watercolor to paint their color wheels in order.
0 Keeps,
0 Likes,
0 Comments
THE PLAN
Students learn about the color wheel and how artists can use them as a resource.
Students learn about ROYGBIV.
Students learn about radial symmetry in the creation of their color wheels.
Students use different types of watercolor in the creation of their art.
circles to trace
pencil, square paper, tracing paper
watercolor: crayola pan watercolor, watercolor pencils, crayola markers, liquid watercolor
1. Introduce lesson with PowerPoint including information about different types of color wheels, how and why artists use them, the rainbow, ROYGBIV, some of the science behind the colors of the rainbow.
2. Students are taught how to find the center of a square piece of paper to find the center. Line a ruler to opposite corners and mark the middle.
3. Once the center is found students may use a compass, trace a circle, to position the circle in the center of the paper.
4. Students are given a small sheet of tracing paper, they trace a triangle from a handout I give them, (so that proportions are correct when tracing the triangle inside the circle.)
5. Students create a simple design inside the triangle making sure that some lines go to each edge of the triangle.
6. Students trace and flip their triangle inside the circle making sure that the lines connect correctly.
7. Once the drawing is complete I show students what I call "the marker magic trick", using Crayola markers to outline a shape then painting over it with water to turn it into watercolor!! Students will use the marker magic trick to some of their shapes, while others they may use the watercolor pencils all for small shapes inside the circle.
8. Students watercolor the rest with Crayola watercolor or tempera cakes.
9.Once finished and dried some students elected to go back and outline with markers to make their lines pop out.
Did the students create a radial design?
How well do their lines connect from triangle to triangle?
Did the student color their wheels in proper order?
I also point out the color names on the markers and make sure students are using the correct colors. When coloring make sure to point out the color for indigo as some students will use the wrong blue. Use red not raspberry, etc...
I tell students not to worry if they accidentally colored their wheels out of order, they can cut the triangles out at the end and glue them down on another piece of paper later.
This is a very time consuming project but the kids loved it!
You can also add talks about value, I had my students shade their corners dark to light with black watercolor pencils to create value.
THE STANDARDS
Visual Arts Standard 1: Understanding and applying media, techniques, and processes
[K-4] Students use different media, techniques, and processes to communicate ideas, experiences, and stories
[K-4] Students use art materials and tools in a safe and responsible manner
[K-4] Students know the differences between materials, techniques, and processes
[K-4] Students describe how different materials, techniques, and processes cause different responses
Visual Arts Standard 2: Using knowledge of structures and functions
[K-4] Students use visual structures and functions of art to communicate ideas


Share!
Comment!