Part 1: This unit will provide students with the in depth knowledge of watercolor technique. The lessons following the technique practice will push students to further adapt an animated style after observing contemporary artists such as James Rizzi and Red Grooms. How can we use the materials as a medium to express mood? Light paint and dark paint? Bold lines? What do bold outlines prompt? We will further discuss our past talk and project about architecture and think about the buildings we looked at in our city. What does style show about an artwork? How can we express ourselves in our style? How can we show our personality in our buildings? After mastering the materials and technique, students will then create their own cartoon city with personality and imagination.
Part 2:
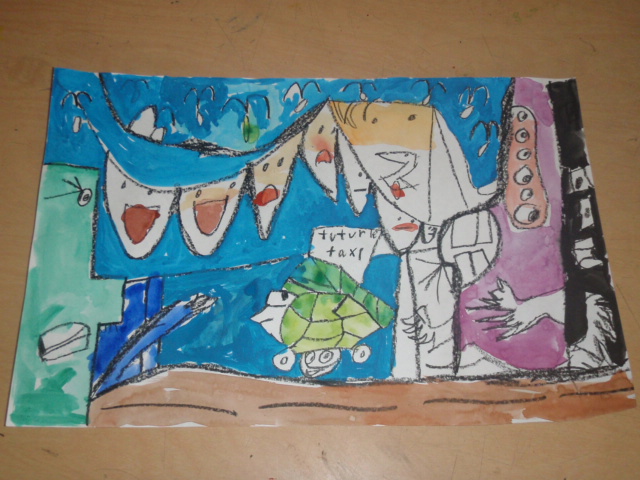
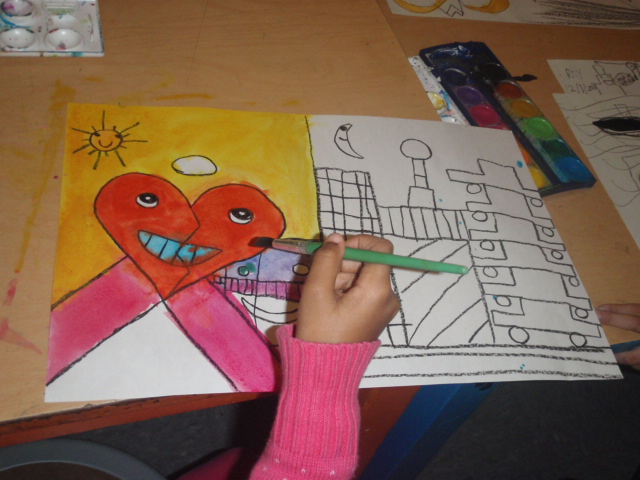
In this lesson students will further practice the technique of watercolor paint while combining a style. They will learn how water and oil resist one another by using bold outlines with black oil pastels. They will discuss and observe artists such as James Rizzi and Red Grooms who work in this style. They will understand the appropriate vocabulary words presented and create an intensive, planned out painting that fills the page with a personality, in a cartoon-animated style. Students can consider incorporating their own personalities creating a city self-portrait; or they may choose to think about personalities in general and associated colors and line that relate. This lesson can be a class collaborative city map or an individual city map.
11 Keeps,
0 Likes,
0 Comments
THE PLAN
4 sessions; 45 minutes per session
1. Students will learn the basic techniques of watercolor and further combine personality, style, and creativity
2. Students will practice the different ways of painting with watercolors
3. Students will understand the relationship between outlining and painting in; resist
4. Students will perceive and discuss comic and animated art
5. Students will create paintings that cover basic techniques and a painting in an animated style
6. Students will understand the concept of combining personality to everyday things
7. Students will continue working with the technique of watercolor and combine a comic style
10. Students will plan out their scene and begin drawing out their animated style painting
1. Sketchbook/Sketch Paper
2. White paper
3. Watercolor paints
4. Brushes
5. Dishes of water
6. Black oil pastels/black crayons
7. Paper towels
8. Artist examples (presentation): James Rizzi, Red Grooms relate to location you are in. Example: if you are in a city, show Red Grooms image of a bridge with the city behind.
PROCEDURE: Lesson 1 (Intro to watercolor)
1. Introduction
• Open discussion: Begin with discussion of watercolor and more specifically paint. How do we paint neatly? Do we use a lot of water?
2. Demonstration:
• Have prepared samples hanging on the board as well as artist works
• Demonstrate the technique (Sign on board: Water, Wipe, Paint, Paper)
a. Dip the brush into water
b. Wipe the brush
c. Put the bush lightly into paint: move back and forth and count to 10. Why? So we have bold colors!
• Make sure they understand that there should not be a lot of water, and we don’t jam the brush into the paint
d. Put a “brush stroke” on the paper (define brushstroke: a brush stroke is the mark the brush makes on the paper) *Do we push hard with the brush? No, we tickle the paper.
e. After this, clean brush in water (option to use paper towel). Don’t mix the colors. Keep them clean!
f. Dip brush into another color, and continue (make at least 10 different strokes!)
g. Demonstrate making strokes of lines, dots, and shapes
• How do we properly hold a paintbrush?
3. Distribute the materials
• Each student will have a set of paints, paper, water dish, and a brush
4. Create
• Students will think about how much water they are using and how lightly they touch the brush to the paper.
• Students will continue practicing for the rest of class the technique of watercolors
5. Clean up & Conclude
• Put away materials, clean hands and table
• We will regroup and discuss some of the art works
• Discuss what was effective
• Discuss the different properties of using the paint
o How to make the colors darker and lighter
o Why don’t we want to use too much water?
PROCEDURE: Lesson 2:
1. Introduction: Begin with discussion of last class. The technique we used and show examples that the students created. Read through the written steps and have students say what to do, and what not to do.
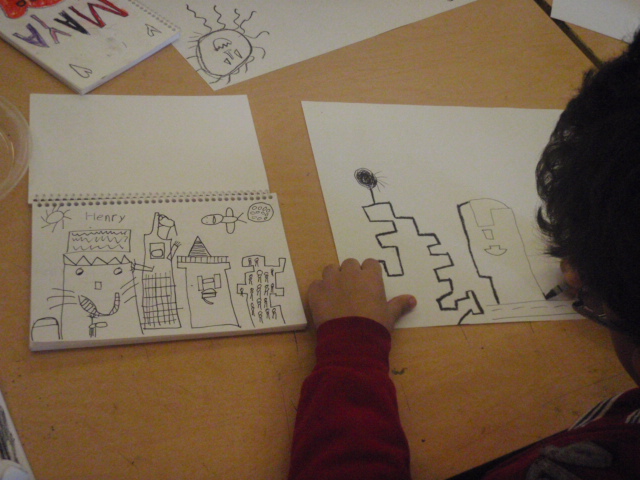
• Show presentation: Talk about cartoon style and the personality shown in their cities. How do cartoons make you feel? What are characteristics of a cartoon drawing (bold lines outlining, no shading). In what ways do the artists show a personality? By the colors, the faces in strange places (on buildings, cars, etc.), and the expressions. Talk about how the pages are full. Think carefully about composition and color choices.
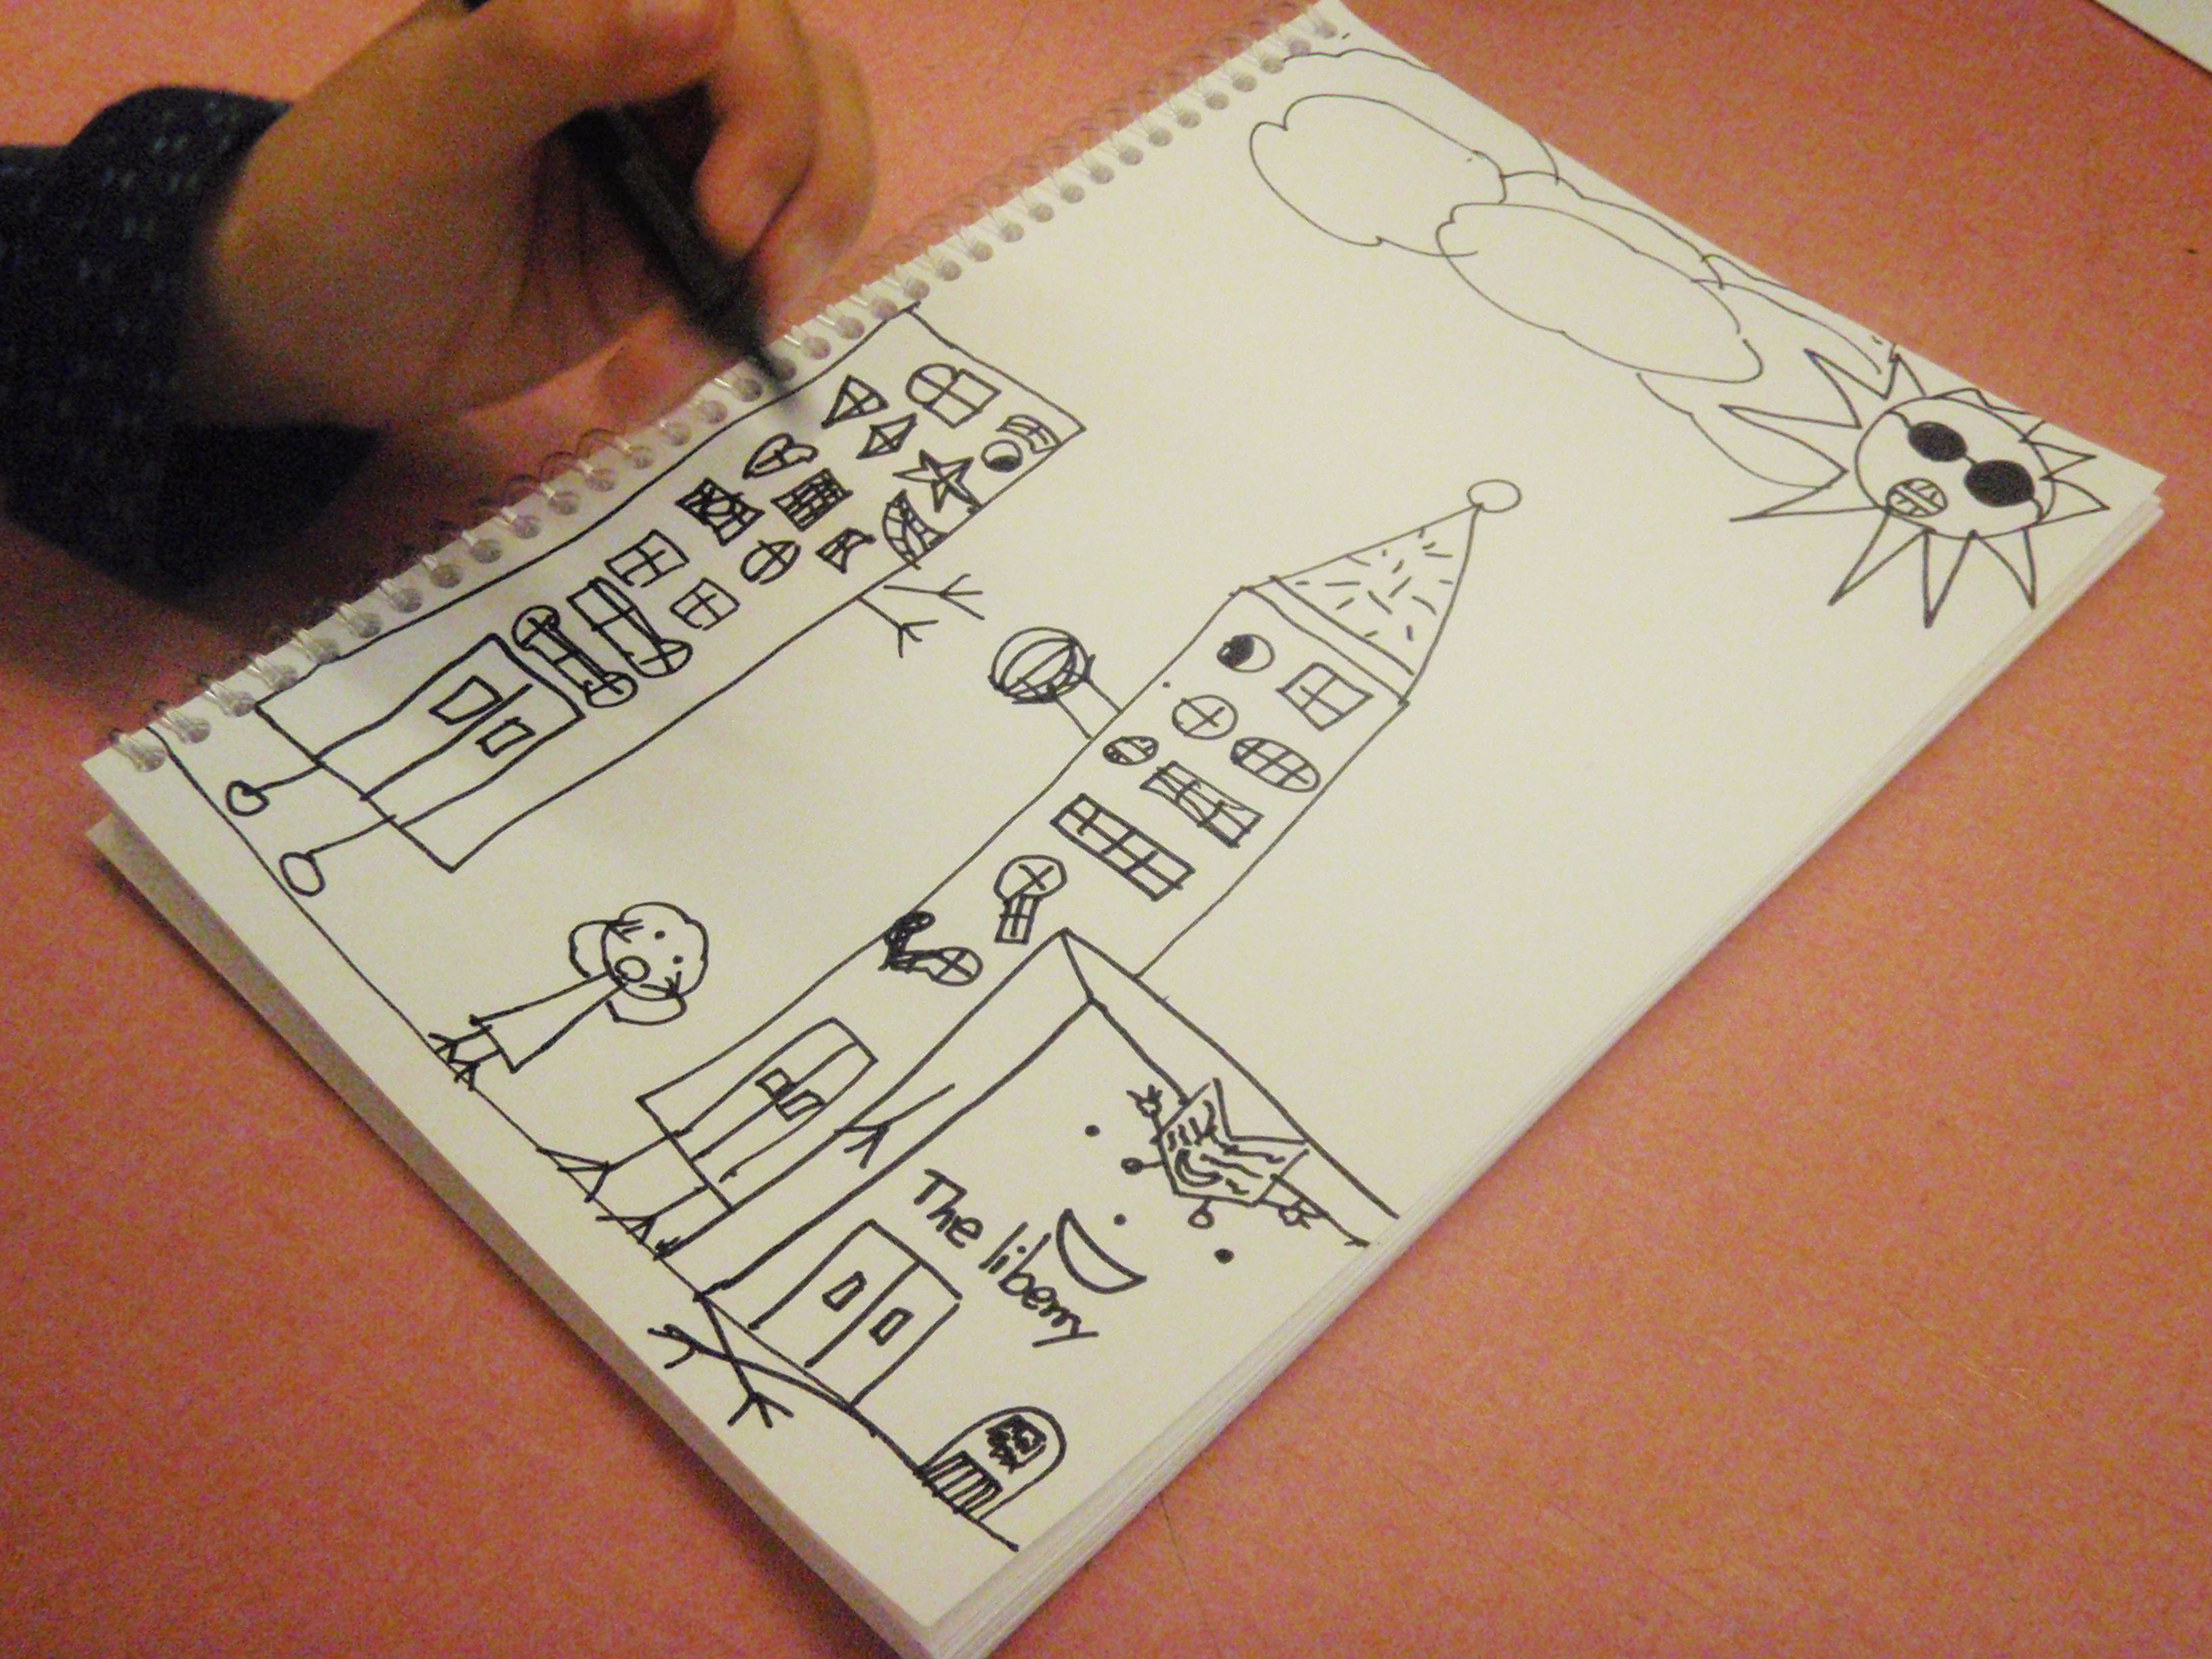
• Brainstorm things and elements in their city and lives (day vs. night, seasons, mailboxes, trains, taxis, buildings- skyscrapers, landmarks, restaurants, low-rise, school, playgrounds, trucks, garbage bin, recycle, street signs, bricks, people, bus stops, food trucks, lights, etc.
• Discuss the steps: sketch out 1or 2 city ideas with many elements.
• Important to consider: elements the student wants to include, composition, color choices, how to fill the page.
2. Demonstration:
• Have prepared samples hanging on the board (since they will not yet be painting, I will not demonstrate the process until next class). Yet, the example will be hung on the board.
3. Distribute the materials
• Each student will have their sketchbook, marker pens, white paper, and an black oil pastel
4. Create
Students will continue thinking and planning out their cartoon personality cities in their sketchbook. If they have time, they can begin drawing with oil pastels on their large white paper that will develop into their final work of art.
PROCEDURE: Day 2
1. Introduction
• Begin with discussion of last two classes. First, the technique we used: Read through the written steps and have students say what to do, and what not to do.
-Have images from the presentation on the board
-Have brainstorm list they made last class on the board
• Discuss what is next: Look back at your sketches; make sure everything you want to include is present. If you haven’t started, begin drawing with your oil pastel on the paper
• Important to consider: elements the student wants to include: composition, color choices, how to fill the page, personalities
2. Demonstration:
a. Have prepared samples hanging on the board.
b. Draw with oil pastel/crayon onto paper (push hard, talk about resist)
c. Water, wipe, paint, paper
d. Fill in areas with bold color paint (swish brush in paint for 10 seconds, go slow and focus on tiny areas)
e. Wash brush and continue filling in areas (carefully! Slowly!)
3. Distribute the materials
• Each student will have their sketchbook, white paper, an black oil pastel, a set of watercolors, brush, water, and a paper towel
4. Create
• Looking back to their sketches, students begin drawing with the oil pastel on the larger paper, they can add to their sketches prior if they feel it would be beneficial
5. Clean up procedure:
• Place art in class portfolio
• Put away all materials
• Clean hands and tables
PROCEDURE: Day 3
1. Distribute the materials
• Each student will have their started painting, watercolors, a brush, water, and a paper towel
2. Create
• Students will finish drawings if they need to and begin painting
3. Clean up procedure:
• Put away all materials
• Clean hands and tables
4. Critique
• Students will walk around the tables and observe their classmates paintings
• Students will have the opportunity to talk about his or her own work, as well as each others work (name something you are really excited about from your work, talk about something you liked in a classmates’ work)
• Place art on the drying rack (after critique)
PROCEDURE: Day 4
5. Distribute the materials
• Each student will have their started painting, watercolors, a brush, water, and a paper towel
6. Create
• Students will finish paintings if they haven’t yet completed
7. Clean up procedure:
• Put away all materials
• Clean hands and tables
• Place art on the drying rack (after critique)
Proficiencies in Materials and Techniques:
• Developed knowledge of specific art materials and vocabulary
• Students understood technique and properly demonstrated the steps
• Able to mix paint with water and create consistencies
• Able to create different brushstrokes
• Able to create thick and thin layers of paint
• Able to create form and shape
• Uses color as an outlet to create mood
Performance and Effort:
• Exhibiting stamina and focus
• Working independently
• Participation in class discussion and class critique
• Participation and completion of project
Personal Expression and Originality:
• Using personal experiences or imagination as basis for artwork
• Making connections between other subject areas and artwork
• Expressing an original artist’s voice; go beyond means of project
Behavior:
• General behavior and responsibility
• Community participant
Assessment System
4 Goes beyond grade standard
3 Meets grade standard
2 Approaching grade standard
1 Does not meet grade standard
If you have worked with watercolors with your students, you can skip step one and go straight to the introduction of personality cities -- with the artist presentation!
Have a sample and do one with them in class as well.
THE FEATURES
Contemporary Art
Color/Value, Form, Movement, Space
Watercolor
History/Social Studies
You must be logged in to keep, like, or comment on this resource.

Share!
Comment!