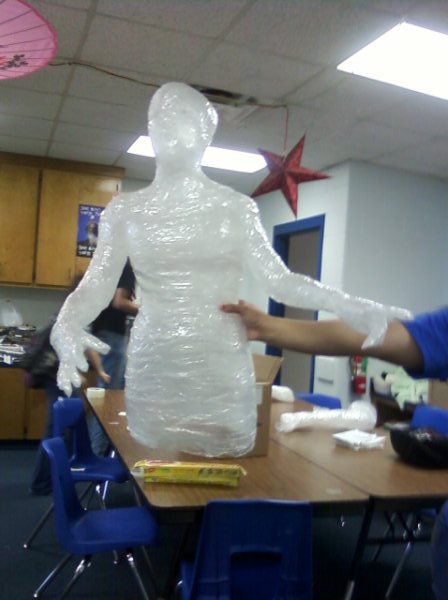
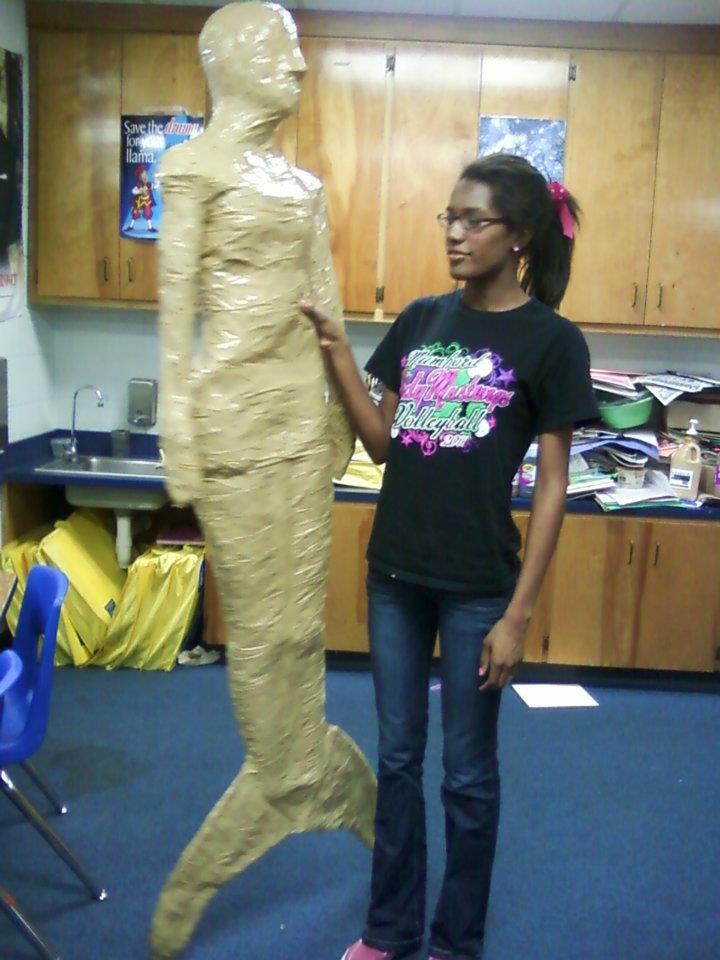
Students make lifesize tape sculptures using packing tape and a safe wrapping technique in teams.
31 Keeps,
4 Likes,
4 Comments
THE PLAN
5 sessions; 50 minutes per session
1. SWBAT create a sense of movement using sculpture techniques.
2. SWBAT work effectively in teams to create a completed sculpture.
3. SWBAT use creative techniques to assembe realistic or abstract pieces of art.
1. Clear Packing tape (about 6 per sculpture, brown may be used if you are confident in removing the pieces)
2. Surgical Scissors (can be purchased at any pharmacy or drug store)
3. Plastic Wrap (3 rolls)
*Students will be creating "tape people" by wrapping separate body parts, cutting them off and repairing with tape, then putting all pieces together to make people.
1. Have students put themselves in groups of 3-4.
2. Students will decide what position their "sculpture" is going to be in.
3. Students can either wrap the same person's body parts, or mix and match different student's body parts for an abstract effect.
4. Body Breakdown: 2 arms, 1 head and shoulders, 1 chest/torso, 2 legs.
5. Start with a student's arm first, and wrap the arm completely in plastic wrap, leaving no holes. Have team members wrap packing tape 3-4 layers loosely around the plastic wrap arm (monitor closely so they don't wrap it too tight.)
6. After layers are solid, Teacher needs to use surgical scissors and cut a single straight seam down the outside of the arm tape piece. Once off the student's arm, repair with more packing tape. You will now have your first piece.
7. Repeat layering steps using plastic wrap first, 3-4 layers per piece, cut off with surgical scissors, and repair.
8. Once all body pieces are done, put them together to make one person.
9. Students may decorate their sculptures, but we have found them best just left alone to emphasize the movement itself.
*For best results, only wrap one body part on the student at a time. (example: just one leg or one arm) if you wrap several body parts at once it can make students nervous, so wrapping one at a time keeps things smooth and calm.
*Be creative in displaying the sculptures. We put them all around the school one year and made good photo ops and conversation pieces.
Grade students on creativeness of the sculpture itself and their individual parts in the group. Make sure all played equal working parts.
Students really love this project because they get to work together and do something that is really creative and it gets them up and moving rather than sitting at a desk drawing. I have always had fantastic results with this!
MrsImpey01/07/2013 at 03:50am
Awesome idea! My sculpture teacher in college used to do this with his fall class, and they would put lights inside and then display them in the quad. What a great group project...I need to do more of those! I've used this technique once before with a special needs class. We did the saran wrap/packing tape technique with a big exercise ball to create a globe. The students had to make a banner for their art festival and the theme was "Art is Everywhere". Then, we took photographs of the students, photocopied them, and then covered them with acrylic. When dried, we soaked the photos in water and rubbed off the paper. This left the image stuck to the acrylic and made it clear. We taped these onto our globe in the shapes of the continents, and then put Christmas lights inside! Turned out pretty cool!
lhARTz01/08/2013 at 04:28pm
I love this! Any chance you think 5th graders could handle it? I'd LOVE to have these all around the building!
StephieArtTeacher01/08/2013 at 04:31pm
I teach 5th grade as well and with my little ones I was apprehensive to try it. However, I think you could base it on the type of 5th graders you have and if they could effectivly work as a team! You can do this same technique with any stationery object (Like Mrs. Impey says above, which sounds way cool!) so you could let them try wrapping objects first and you can help them cut it off and patch it back up, then see if they could handle doing a person. Close supervision and teacher help is key in this! Good Luck!
tuckerabiArt01/08/2013 at 04:38pm
What an awesome lesson! Great for team building skills also! I'll need to try this!!
You must be logged in to keep, like, or comment on this resource.


Share!
Comment!