Students will learn about texture, contrast, printmaking, clay (slab), and fossils in this two part printmaking and clay unit.
I do this with 2nd grade students.
15 Keeps,
2 Likes,
2 Comments
THE PLAN
5 sessions; 40 minutes per session
SWBAT define texture
SWBAT Show contrast in their art
SWBAT use line effectively to create a self portrait
1. Scrap paper- practice paper
2. Pencils
3. White Styrofoam (I get mine from the cafeteria and I clean them completely) cut to the size aprox. 3"x4"
4. White clay (1/2lb? I eye it out)
5. Rolling pins
6. Canvas( or something to roll clay so it doesnt stick to the table.)
7. Black acrylic paint
8. Metallic acrylic paint
9. Printmaking ink (I use primary colors or you can use tempera paint instead of ink)
10. White paper cut aprox. 5"x 8" ( folded in half)
11. Strong string ( for fossil display)
12. Mirrors ( class pack)
13. Black sharpie markers
14. Brayers
There are two parts to this unit .....printmaking then clay.
Part 1: Printmaking/Andy Warhol
Day 1:
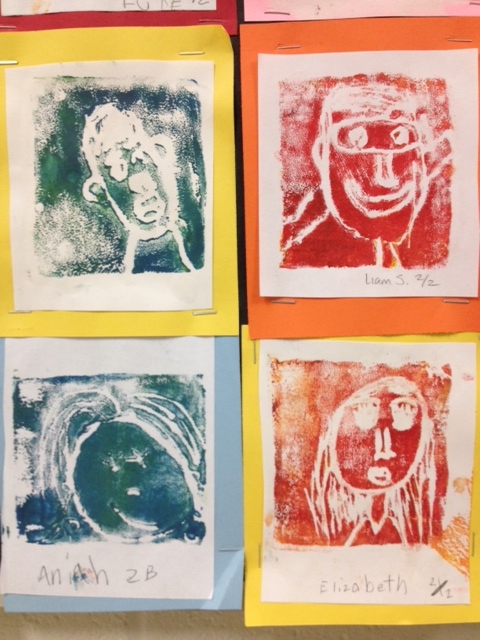
1. Show and discuss Andy Warhols' self portrait prints (10 min.)
2. Demonstrate/ review how to draw a ( self) portrait
3. Students trace styrofoam twice on scrap paper and practice drawing a self portrait on using a mirror.(20 min)
Day 2:
4. Draw your self portrait filling the space on the styrofoam (dont draw too small)
5. Trace the entire face with a dull pencil at least twice. Be sure to press hard enough, but dont break through the styrofoam if you can help it.
Day 3:
6. Demonstrate printmaking techniques using a brayer and primary colored ink(colors mix to make secondary colors).
- students can choose to use two of the primary colors for their prints.
- students print their face onto the white 5"x 8" to make two face prints
7. Sign and complete the prints
8. Completely wash the Styrofoam with warm soapy water
9. If the face did not show up (no contrast, lines not visible) trace over the face some more with pencil.
10. Matte on colored paper if you would like to display.
Part 2: Self Portrait Clay Fossils
Day 4:
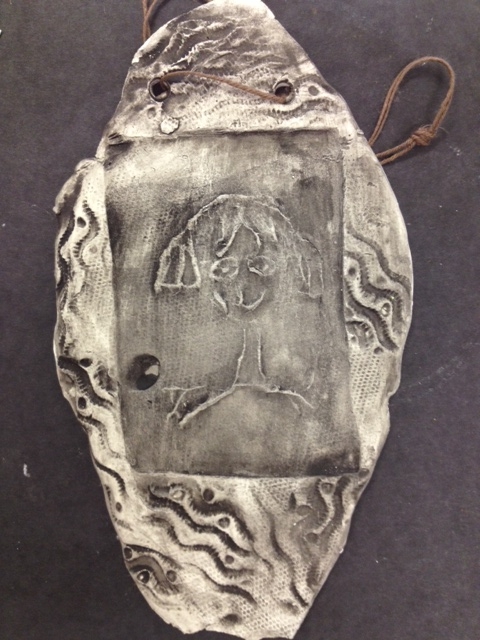
1. Discuss fossils and clay properties
2. Students roll out the clay into a 1/4 " thick slab and smooth it out including the edges.
3. Press the styrofoam face n the center once clay is smooth.
4. Gently roll over the foam with roller and leave in place (be sure to press hard enough for the print to show up. Do not remove the styrofoam until the end).
5. Use your shoe (take it off and press into the clay firmly) to create texture and shoe print around the styrofoam until the texture is visable.
6. Smooth edges and shape the slab if you would like.
7. Carefully pull off the foam.
8. Teacher pokes two holes next to one another at the top of the fossil (and carves name on back)
Day 5:
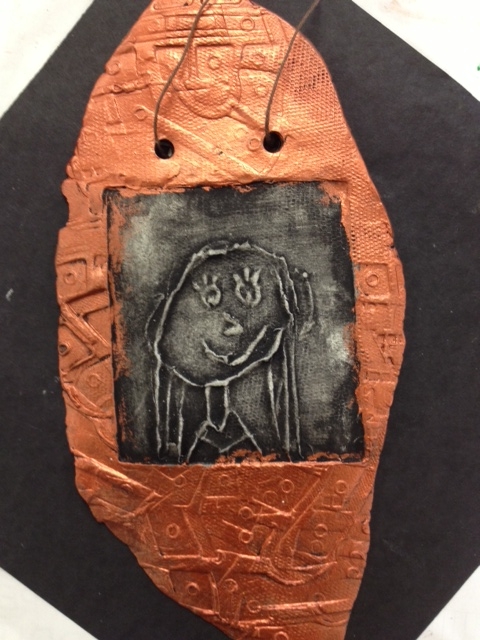
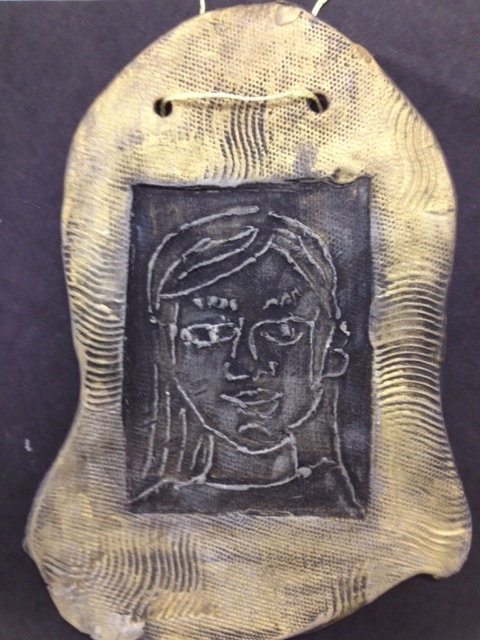
9. Once clay is fired, students paint on black watered down acrylic (it should look dark).
10. Quickly, before the paint dries, use a sponge to wipe away just enough black so that the texture and portrait shows contrast (within the raised areas).
11. Use metallic paints to paint the border or frame of the fossil (wipe away to show some black if you prefer)
Student will reflect on their artwork. They should be able to answer the following questions:
-Does their face show up (is there contrast)?
-Is your portrait drawn using correct proportions?
(I have a rubric I use that aligns with the way our art department grades).
It's really nice to have the kids doing sketchbook activity while I work with smaller groups on the printmaking as well as the fossil painting.
THE FEATURES
Andy Warhol
Pop Art
Contrast, Line, Texture
Ceramics, Printmaking
Geography
MosaicME04/01/2013 at 01:38pm
I like how you use the printing plate to create more art.
Camela05/27/2013 at 05:37am
This is a great idea for using the printing plate in a new and innovative way.
You must be logged in to keep, like, or comment on this resource.


Share!
Comment!